Fly Recipe: EZ Bloodworm
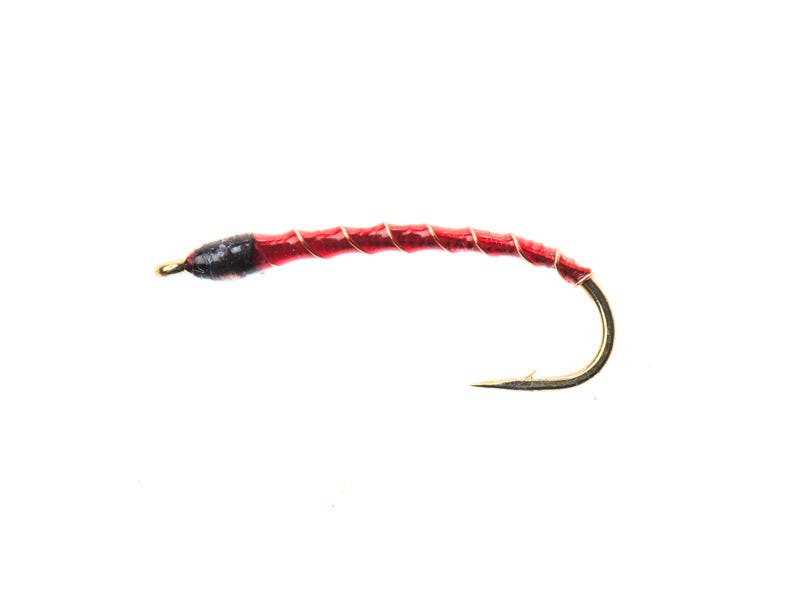
EZ Bloodworm
This is a simple and easy to tie blood worm pattern. If you spend much time fishing lakes, you will need to have a few of these in your box. I carry a few in sizes 12 to 18. I also like to have them in a few different shades of red, from dark to light. This is an unweighted design, so it will take a few minutes to get down to depth, depending on how deep you choose to fish it. I have also used them in the area rivers under an indicator and done quite well with them.
Material List:
Hook: Tiemco TMC 2312 Terrestrials & Caddis Dry Fly Hook
Body: Wapsi UTC Ultra Thread - Red - 70 Denier
Special Detailing: Black Permanent Marker
Finish: Loon UV Clear Fly Finish FLow
UV Curing Light: Loon UV Power Light
Video Transcription
Intro to the EZ Bloodworm
Hi. Keith here from North 40 Fly Shop. If you do a lot of still water fishing, of course you're going to be probably using a bloodworm quite often. There's a little difference between a bloodworm and a chironomid just in the design, not much.
Step-by-Step Tying Instructions
Size wise, you're gonna run them anywhere from 10, which is a fairly large one all the way down to, say an 18. As the name implies, it's generally gonna be red. I have tied some up in a wine color, which is an offshoot of red.
This particular pattern is a real simple one. There's not a whole lot to it. Material wise, very effective. We'll get started with that in just a second.
Okay, I have a size 12 Tiemco 2312 straight eye. I like the straight eyes when I'm fishing these because I get a little more action with them, especially if I put some type of a loop knot on there.
For body, real simple, red thread. This is 70 Denier Ultra Thread, and we'll get this started. And then the only other material that we're gonna be adding to this by way of flight tying material, is just gonna be small Ultra Wire, silver, copper, whatever color you want to use that you feel comfortable with.
When you tie this in, you want to tie it in hook side, facing towards you. It'd be on my side of the hook and you want to tie it right along the side. Like I said, there is a real no-brainer on this one but it is effective.
As I stated before, there's no weight to this other than the hook. It does take a little time to get down. The other thing too, is I run my thread all the way into the bend. It just gives the illusion of the tail bending when they're moving around.
When you wrap it back, you want nice touching thread wraps. You don't want to build up too much on the hook. You want to keep this sparse. If you've ever seen the bloodworms, they're not real big.
Usually one down, one back is all I'm gonna do. Take my thread right up to about there. The next thing is your wire. How many wraps? I don't know. You want about seven segments if you can do it. Throw a half inch in there to make sure it stays where it's want.
Take one full wrap around and then just start segmenting back. Just keep your wraps nice and even. Like I said, you want about seven segments but whatever works out for you, that's okay.
I really don't think the fish count them.
The other thing you want to do is make sure everything is nice and snug on there. Wrap that all the way up to the head and tie it off. A couple good wraps over the top, couple in front, helicopter that off and then you start building your head.
Now the head is really not a whole lot there. It's just a build up of your thread. You want to kind of even it out so it looks good. Like I said, there's not much taper to this particular design that I have here, as like in a lot of other ones.
You don't want a real fat head. That's gonna be about good enough right there. Give yourself a whip finish. Finish that off. There you go. That's pretty much it for your tying.
Now, one of the little tricks is the head sometimes is a little different color. What I do, is I just take a Sharpie, a black one here and I'm just gonna add, just color that top up a little bit, just to give the illusion of a head.
You don't have to get real fancy with it. That'll do right about there. The only other process you've got here is, we're going to coat the whole thing in the Loon UV Fly Finish, the clear in the flow.
It's real thin, because you're just gonna do a real light coat on there just to kinda seal everything up. Like I said, you do not have to do a whole lot. You can crank out a dozen of these in no time.
Make sure it's all evened out. There you go. Hit it with your light. Simple as that. That's why its the EZ blood worm. Trust me, these things work when other things aren't.
It's always good to have a dozen in your box, a couple of different sizes. Like I said, two of each size just to fit what you need to fit. There you go. Thanks for watching. Good luck to you!
If you have any further questions on fly tying, please come visit us at any of our retail locations or North40.com.
Want to fool a fish on a fly you've created? Learn more fly tying recipes here.
© 2024 CSWW Inc. All Rights Reserved. Use of this site is subject to certain Terms of Use which constitute a legal agreement between you and North 40 Outfitters.