Fly Recipe: Tyler's Big Pheasant Tail
Tyler's Big Pheasant Tail
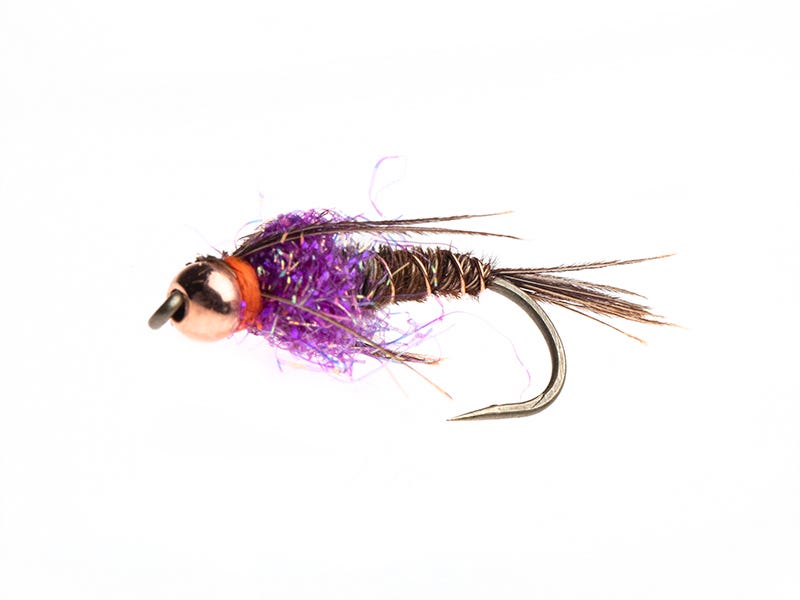
The pheasant tail nymph is synonymous with fly fishing. It has been my go-to fly for a long time. I really favor it though in a larger format. The typical ones you'll see in the fly shop bins are anywhere from size 20 on up to a 12 if you are lucky. I fish in the west, and we fish big bugs often. So, I started deviating from the traditional pheasant tail nymph recipe.
I tie them up to a size 8 3X long hook. I like a dubbed thorax versus the original peacock herl, and what better color dub to go with? -purple u.v. of course! Lastly, I like it to have a "hot spot." I use fire or hot orange thread for the collar. The rest of the fly uses the traditional specs. Pheasant tail for the actual tail of the fly and also for the abdomen and wing case. The abdomen is ribbed with your standard variety copper wire too. This fly has probably accounted for the larger portion of the trout in my fly fishing career. I do fish others when necessary, but, man this one is tough to beat.
Material List:
Hook: Umpqua U Series Nymph Hook U103 size 10
Thread: Denier Danvilles 210 Hot Orange
Bead: Brass Cyclops 1/8"
Ribbing: UTC Wire Med Copper
Tail: Pheasant Tail - Natural
Body: Pheasant Tail - Natural
Thorax: Brown UV Dubbing
Video Transcription
What's Different about Tyler's Big Pheasant Tail?
Hey guys, Tyler at North 40 Fly Shop in Coeur D'Alene. Today we're going to show you how to tie Tyler's Big Pheasant Tail, so this is kind of my spin on an old classic, the Pheasant Tail. But, a little bit bigger pattern, this is going to be a size 8. Kind of my addition, that I put on to the fly is the purple UV dubbing, which has become really, really popular and a hot orange collar on the front here.
It's kinda been one of my favorite things to do on a lot of my nymphs. I don't know if it makes that big of a difference or not, it's what I like to do. It sure does work great. This is probably my number one favorite fly, if I were to go out on a limb and say it. But, a little bit bigger nymph here, so size 8, it's got the lead underneath in the thorax, so this thing is going to sink quickly so in the springtime whether you'd be fishing a March Brown hatch on the Clark Fork, or stone flies on the Coeur D'Alene River, this is a great one. You can run it as a dropper off of your hopper or you run it as a lead fly when you're nymphing, however you want to do it, but this is kind of a spin on an old classic here and let me show you how to tie it.
Step-by-Step Tying Instructions
Okay guys, so let's get started here. So first step is you want to put your bead on your hook, so we're gonna do a copper bead. You can do a gold bead. It's really up to you on what you want to do. Again, there are a few different sizes of beads that fit on the nymph hooks. I believe this one here is an eighth. Anyways, you can do tungsten, whatever you want, so go ahead and get your bead on first. Next step is we're gonna put our lead on. This is .030 lead, so we're gonna twist some lead on here. Okay, that's about five or six wraps is all you need. Trim your tags. Okay next, we're gonna secure the lead here. So I'm using a pretty heavy thread here guys. This is Danville's 210 denier and it's in the hot orange. Make a few wraps over the lead here to secure it. I'll even go so far as to put a little head cement right on there and that helps hold the bug together just a little bit better. Good.
Okay, next we're gonna put our pheasant tail in. So when I'm putting the pheasant tail in, this is actually the tail portion. I like to look for these maroon or kind of reddish color tips here. Okay? So I want to get a good section here. Pull those off. And not a very long tail, so I'd say probably about a quarter of the length of the shank of the bug is about what you want. So that's right where I want it. Tie that in. Trim. Okay next, we're gonna put our copper ribbing in and this is brassy, which is the size. It's the Ultra Wire Brassie size in copper. Tie that in. If you've noticed, I've tied in the copper just a little bit further up here. Again, if you guys are new to fly tying, the copper is really slick, and if you don't tie it in very well, then you go to start ribbing your nymph, it can pull out on you, so make sure you tie it in really well. It also does help taper the fly slightly, too, so I tie it in kind of the full length.
A Common Technique to Use
Next, for the tail we did about yea much. For the body, we're gonna do about yea much. A little bit more. About twice as much as what you use for the tail. Okay, now we're gonna tie in this section at the tips back here. Secure that in, bring your thread forward, and then we're gonna wrap. If you can get the fibers kind of flattened out there it works a little bit better. And I trap every time I come around, okay? I'm gonna make about three wraps, secure it, trim, good, kind of wrap that down a little bit. So now your copper wire, we're gonna counter rib, a pretty common technique we use in fly tying, so again, if you guys are new, so we went clockwise with the pheasant tail, we're gonna go counterclockwise with the copper wire. So we're gonna make about four wraps is all you need. And it does two things, so it's gonna spread out over that pheasant tail and secure it. It's going the opposite direction, so it's kind of going across the fibers there. It adds a little bit of color, a little bit of weight, not much, but definitely helps hold the fly together.
Okay next, we're gonna do our wing case. So again, we're doing pheasant tail again here. We're gonna use maybe about the same amount as we used for the the body, maybe just a touch less. So I'm gonna pre-measure here. I'm gonna be about the length of my tail from the eye of the fly back to the length of the tail is what I want. Cut that, secure it in. Okay, the tips guys are going rearward. We're gonna fold this over. It's actually gonna get folded twice. That's gonna get folded forward, and then back for the legs, so you want to make sure you don't short sell yourselves there. Okay, now our dubbing. We're gonna go our UV Purple dubbing. Everybody's tying with purple now. It seems to be the hot color. And so get my dubbing put on there. I like to go pretty fat for my thorax here, so about three little sections of dubbing on there and go for it. Go ahead and wrap it on there. I kind of wrap right in the middle, leaving a little bit of a gap up here at the front for my tie off area.
What Really Helps Hold it in
Okay, now we're gonna fold the wing case over. So we're folding it over, getting it nice and flat. All you need is maybe one or two wraps here and then we're gonna split and divide the legs back. One, two, good. And a few wraps there, we're gonna whip finish the fly, about three. That's it there, almost done. Trim. Okay, I'm gonna shorten my legs up just a touch here. Good. And a little bit of glue. Okay. And I actually go back on the abdomen back here, just a few little touched in there, that really helps hold it in. And a touch on the top, why not? Call it good.
So that's Tyler's Big Pheasant Tail. Again, nothing mega-fancy here. The fly's been around for a long, long time. Again, I just added the UV dubbing there and a little bit of hot orange up front there and that's it. This is a killer fly, great in springtime or throughout the year if you wish, and I appreciate you watching. Thank you.
Thanks for watching. If you have any further questions on fly tying, please come visit us at any of our retail locations or North40.com.
Want to fool a fish on a fly you've created? Learn more fly tying recipes here.